Treatment Planning Remains Crucial

Treatment carried out by Adam Carstairs
Adam Carstairs qualified from Guy’s Hospital in 1998 and has worked in private practice since 2010. He has a particular interest in orthodontics and has attended several training courses in the field, including the ClearSmile Advanced course by IAS Academy.
I am a general dentist who has been providing fixed orthodontic treatments focusing on anterior alignment cases for a number of years. I was always looking to expand my knowledge and increase my skills in relation to orthodontic understanding and treatment. The opportunity then arrived to enrol on the 14-month ClearSmile Advanced Course by IAS Academy, enabling me to study and treat comprehensive cases under the excellent guidance, teaching and mentorship of Professor Ross Hobson, Specialist Orthodontist. As with all training courses provided by IAS Academy, there was a strong emphasis placed on accurate assessment, diagnosis and planning.
Case Presentation
The patient originally attended for an orthodontic consultation, with her main complaint being that she didn’t like the look of her front teeth and would like them to be straighter. The patient had a clear medical history, was a regular attendee with her routine dentist and had not undergone any orthodontic treatment previously.
IAS Academy teaches that one of the most important parts of orthodontic treatment is the patient assessment. Once a particular treatment strategy is started, subsequent changes are often difficult. If it is decided that extractions are needed, the process is irreversible so it must be carefully considered during the treatment planning.
Inappropriate orthodontic treatment can produce adverse results and it is essential that full examination of the skeletal form, soft tissue relationships and occlusal features is performed prior to undertaking treatment. It is sensible to carry out the assessment in a logical order so that none of the steps are missed – this is a continued ethos throughout all courses linked with IAS Academy.
| Measurement | Result |
|---|---|
| Skeletal | Mild Class II |
| FMPA | Average |
| Lower Face Height | Average |
| Facial Asymmetry | No facial asymmetry, competent lips at rest |
| Soft Tissues | Thin biotype, but healthy soft tissue |
| Overjet | 1mm |
| Overbite | 50-60% |
| Crossbite | Present between UR2 and LL5 |
| Displacement on Closure | None |
| Incisor Relationship | Class I |
| Molar Relationship | Class I |
| Canine Relationship | ¼ Class II (bilaterally) |
| Teeth Present | UR8 (partially erupted) UR1-7 | UL1-7 LR1-7 | LL1-7 |
| Centrelines | Lower shift of 1mm towards the right |
Treatment planning
The patient had crowding of 4-5mm in the upper labial segment, 1mm of crowding in the buccal upper right quadrant and 6mm of crowding in the lower labial segment. Radiographs were taken to assess tooth /root shape and bone levels, and check for any pathology. Clinical photographs and impressions were then taken for a set of orthodontic study models.
The case was borderline extraction/non extraction with interproximal reduction (IPR), but due to the identification of a thin gingival biotype – particularly in the lower incisor region – a decision was made to extract all four first premolars. This was to create sufficient space to align the teeth and prevent significant proclination of the anterior teeth which would likely lead to gingival recession.
Treatment
Treatment started with extraction of all four first premolars over two separate appointments. Two weeks after the last extractions, the patient attended for upper and lower bond ups. Molar tubes were placed on all first molars and ceramic (monocrystaline) brackets MBT .22 prescription were placed on 5-5 in the upper and lower arch, excluding the upper and lower laterals (to be added later when there is more space to do so).
Lacebacks were placed between the first molar and second premolar in all quadrants. To begin canine retraction, three units of powerchain were placed under the archwire between the canine and second premolar in all four quadrants. 0.012 NiTi archwires were then placed in the upper and lower arches.
During the second review appointment 12 weeks later, brackets were bonded to all laterals, but everything else remained the same. After six more weeks, the arch wire was changed to 0.016 in the upper and lower arch.
Over the consequential appointments, the lacebacks were placed molar to canine in all quadrants and the arch wires were changed to 20×20 NiTi and then 19×25 NiTi in both the upper and lower arches. Once in 19×25 NiTi, the lacebacks were kept in place and powerchains were placed in the upper and lower 6-6 to close the anterior spaces.
Once the overjet had been reduced to 1-2mm, the lacebacks were removed but the powerchain was continued on the 6-6 to close any residual space from behind. Before these gaps were fully closed, the lower arch wire was changed to a 19×25 NiTi rocker arch to decrease the overbite.
The patient was kept in 19×25 NiTi arch wires in the upper arch with a powerchain on 6-6 to help close the final space between the LR1 and LR2, and UR1 and UR2. The overbite was reducing nicely. The 19×25 NiTi rocker arch was kept in the lower arch and the powerchain on 6-6.
It was later noted that the lower first molars were tipped significantly lingually. The second molars were bonded with molar tubes to help align them with the rest of the arch. The overbite now looked about right at around 15%.
The upper arch wire was kept in 19×25 NiTi. The lower arch wire was changed to a 19×25 SS a/w to prevent an anterior open bite from developing (if kept in place, the NiTi rocker arch will continue to decrease the overbite). The crimp-on hooks were placed mesial to the upper canines to start class 2 elastics to the lower 6’s using ¼” 4.5oz elastics. There was still a small gap between the LR1 and LR2, and UL1 and UL2 at this point. The powerchain was continued on 6-6 of upper and lower arch.
By the next appointment, the spaces had closed between the teeth on the upper arch, but the patient had some concern over the black spaces near the gum margin between the upper front two teeth and UR1 and UR2. There was still a small gap between the LR1 and LR2.
Some IPR was performed to broaden the contact points and a powerchain was placed on the lower 6-6 to help reduce the black triangles. The upper arch was then changed to a 19×25 SS a/w and wire bend placed to extrude the UL5 and improve occlusion.
Once the lower space was closed, a similar concern regarding black triangles as with the upper arch was noted in lower incisors. Some IPR and detriangulation of the lower incisors was performed and a powerchain added on 6-6 to close gaps. The bracket on the UL5 was re-sited and the patient continued class 2 elastics as before.
When the patient was in 19×25 SS in the upper and lower arch with all gaps closed, black triangles improved and good alignment achieved, she requested to finish treatment. Silicone Impressions were taken for upper and lower bonded retainers. At debond, the lingual/palatal surfaces of the upper and lower 3-3 were cleaned and the enamel surface layer was removed to improve bond strength. The pre-bent retainer wire using wildcat 0.0175 was bonded using etch, moisture insensitive primer and a flowable composite. The brackets and retained cement were removed from the teeth, with minor contouring of the incisal edges performed as necessary.
Some time was given to allow for settling of the occlusion, particularly in the UL5 region. Impressions were then taken for the upper and lower removable retainers.
Case-appraisal
At debond, the final tooth positions demonstrated good alignment on both the upper and lower arch. Almost a Class I canine and molar relationship had been achieved. Both the final overbite and overjet were acceptable and the deep bite had been improved from before treatment.
One of the criticisms of this case would be that the occlusion had not quite settled in. Ideally, I would have liked to improve this further and perfect the finishing positions of the 5’s, but the patient was content with the outcome and requested to finish treatment. The positioning of the 5’s should improve slightly upon settling of the occlusion.
 Pre treatment face
 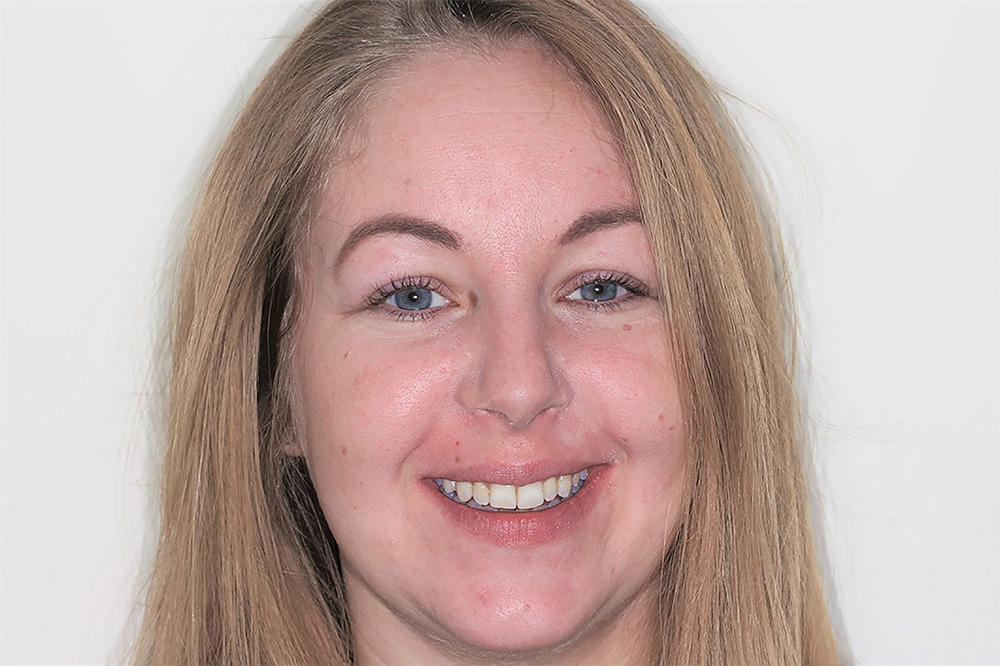 Post treatment
 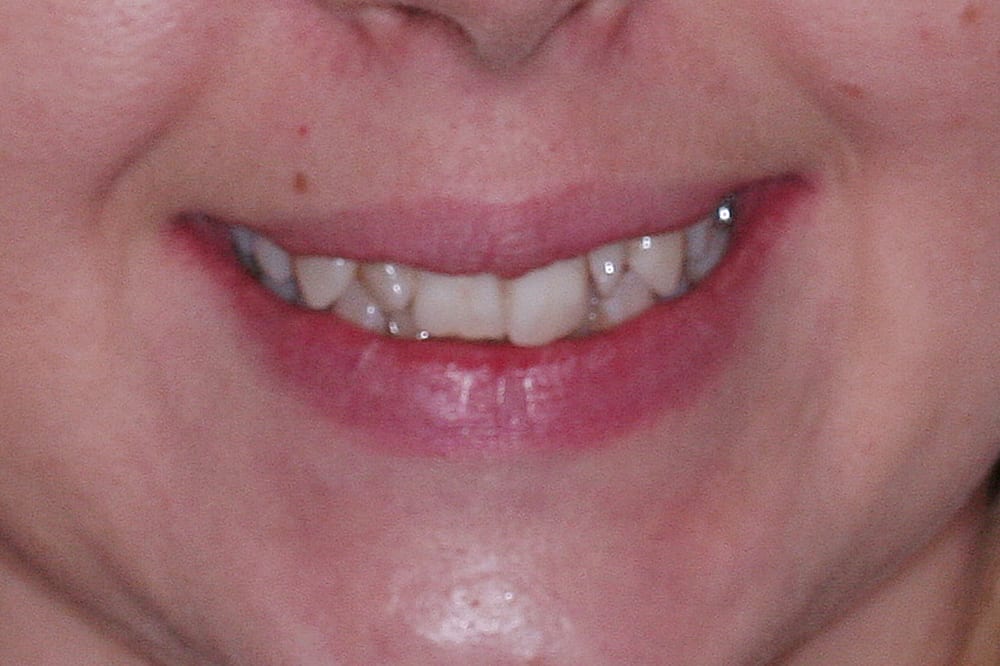 Pre treatment smile
 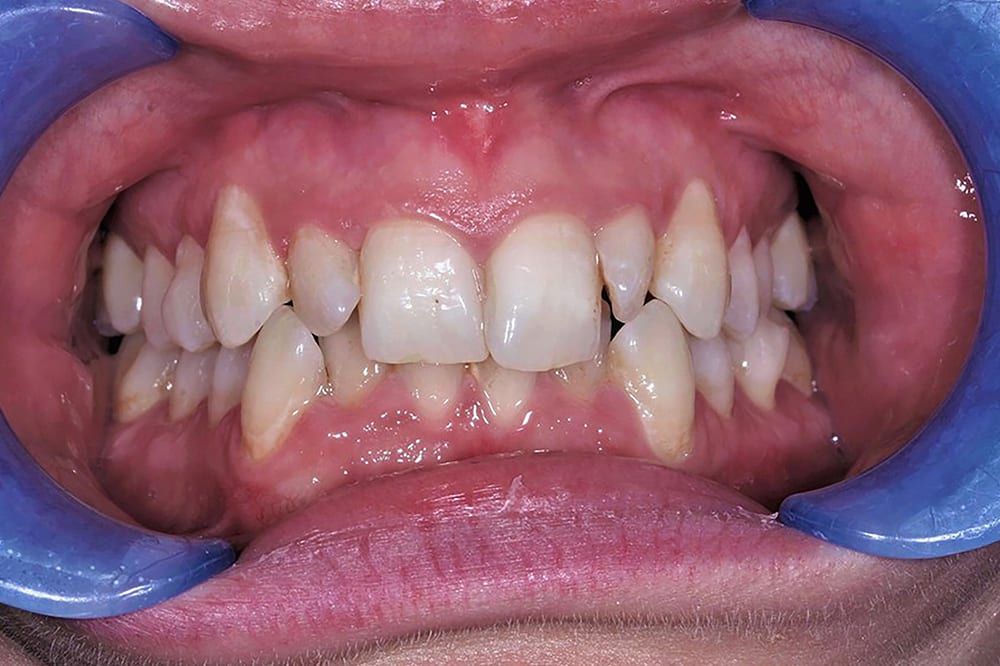 Pre treatment anterior
 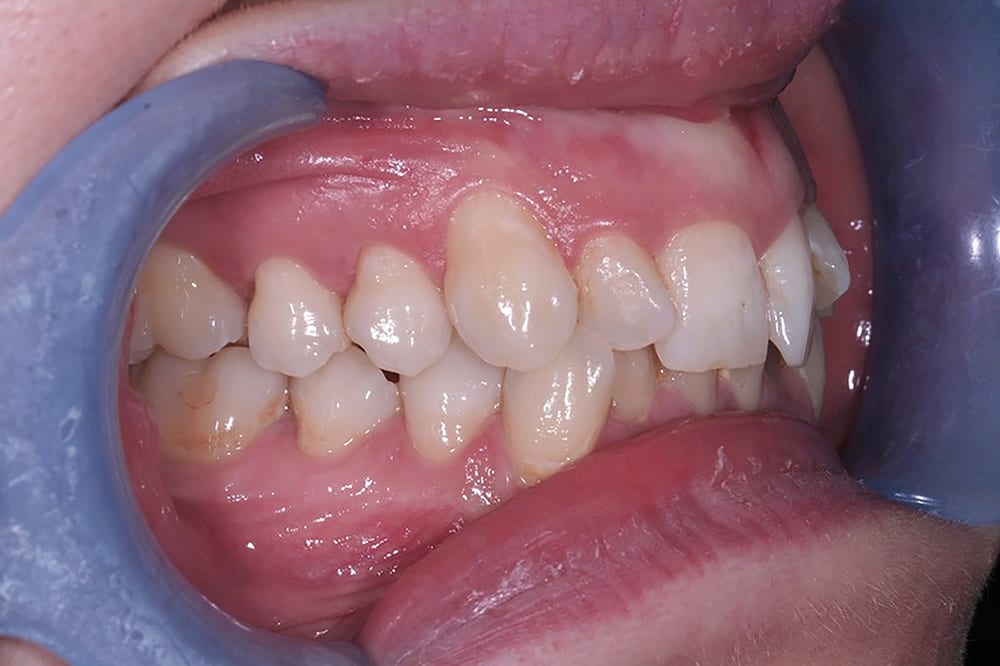 Pre treatment right lateral
 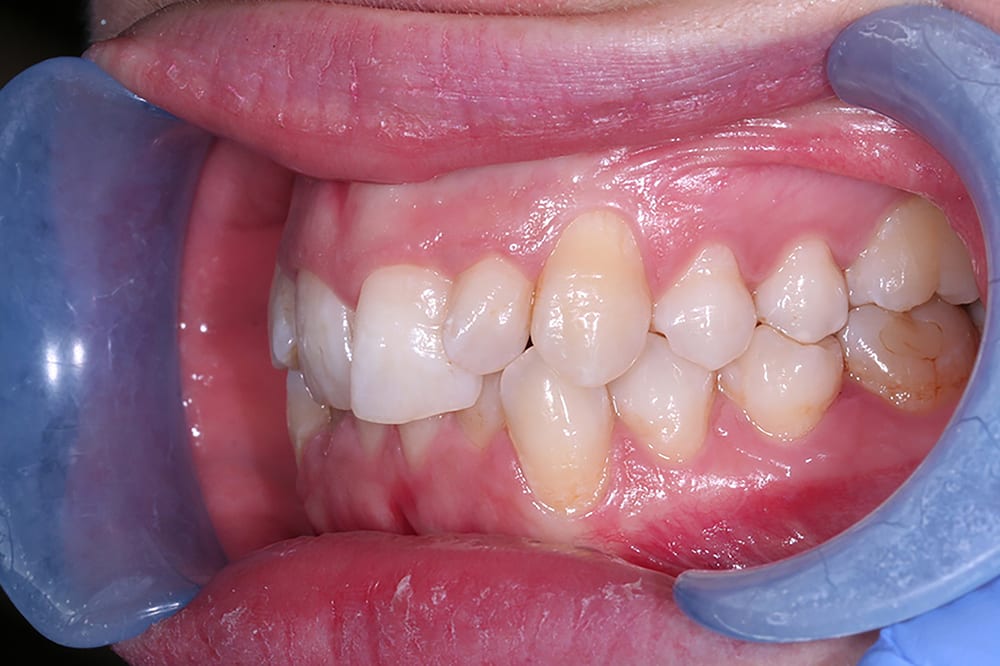 Pre treatment left lateral
 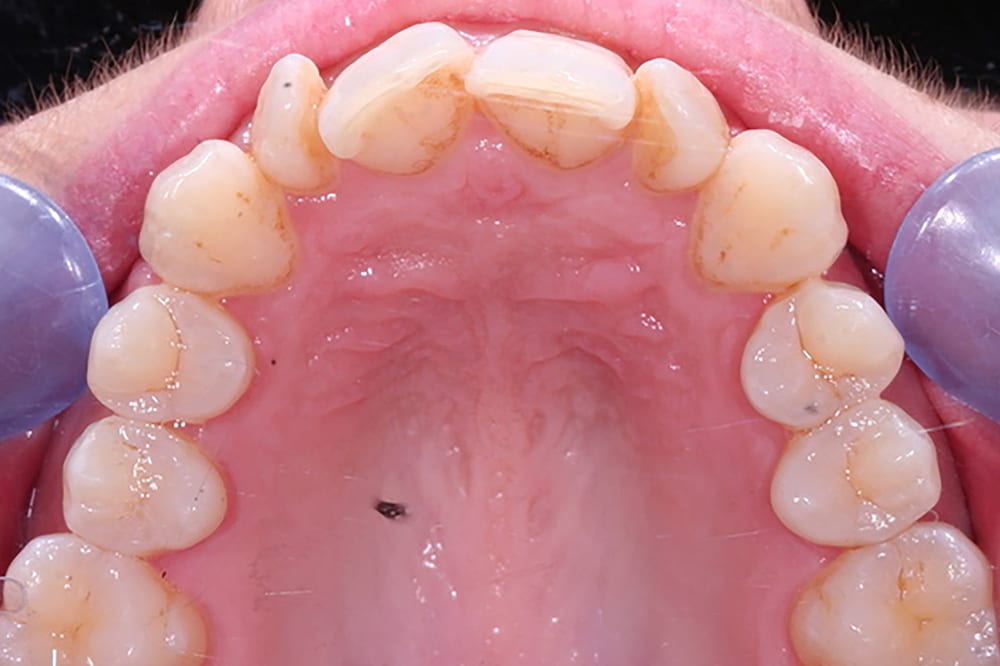 Pre treatment upper occlusal
 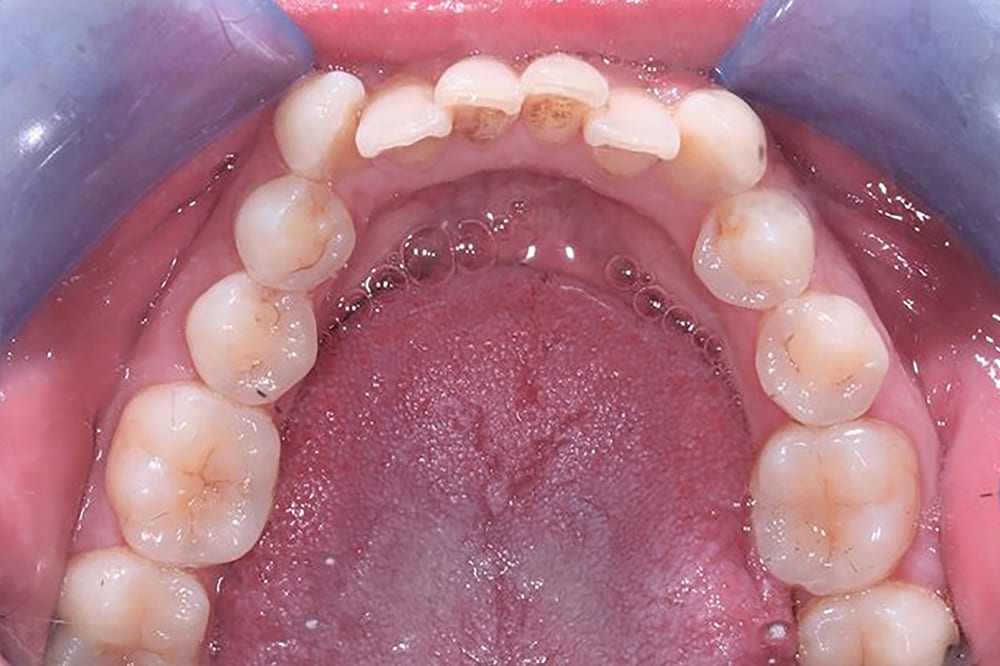 Pre treatment lower occlusal
 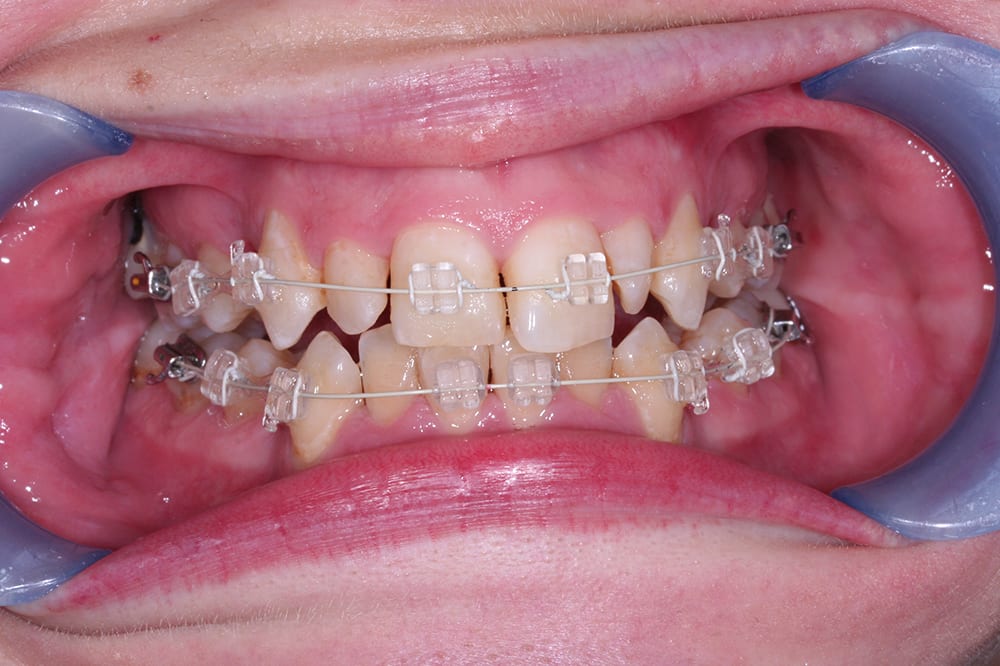 6 weeks into treatment
 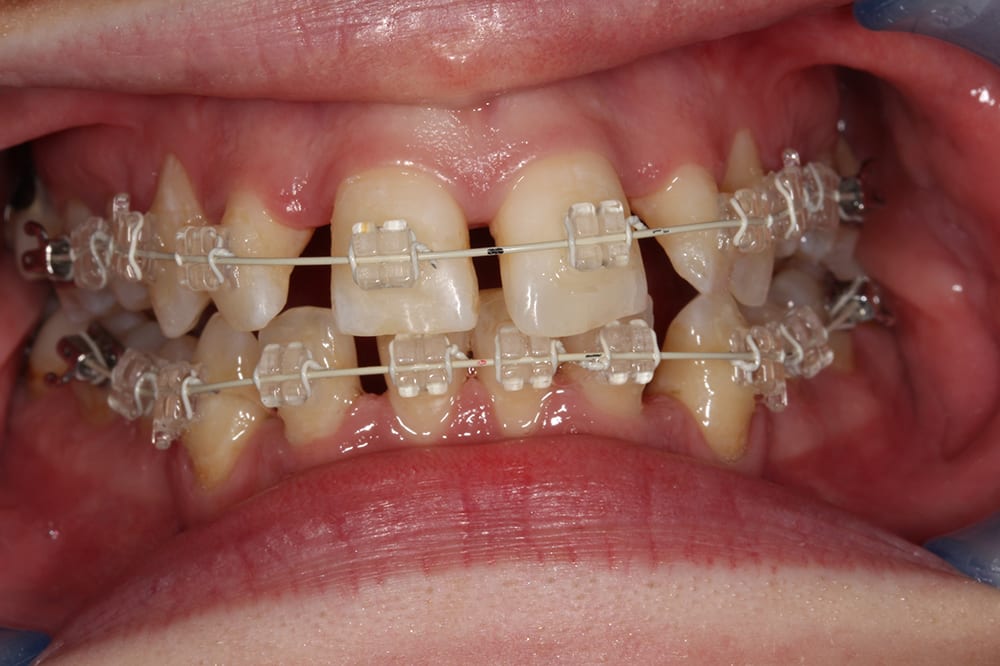 4.5 months into treatment
 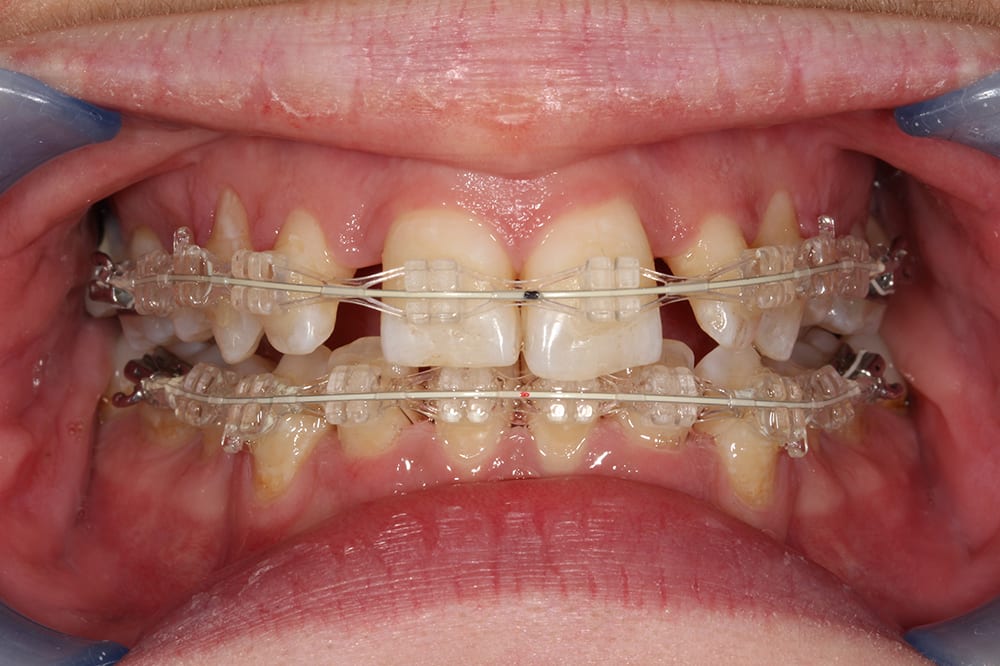 9 months into treatment
 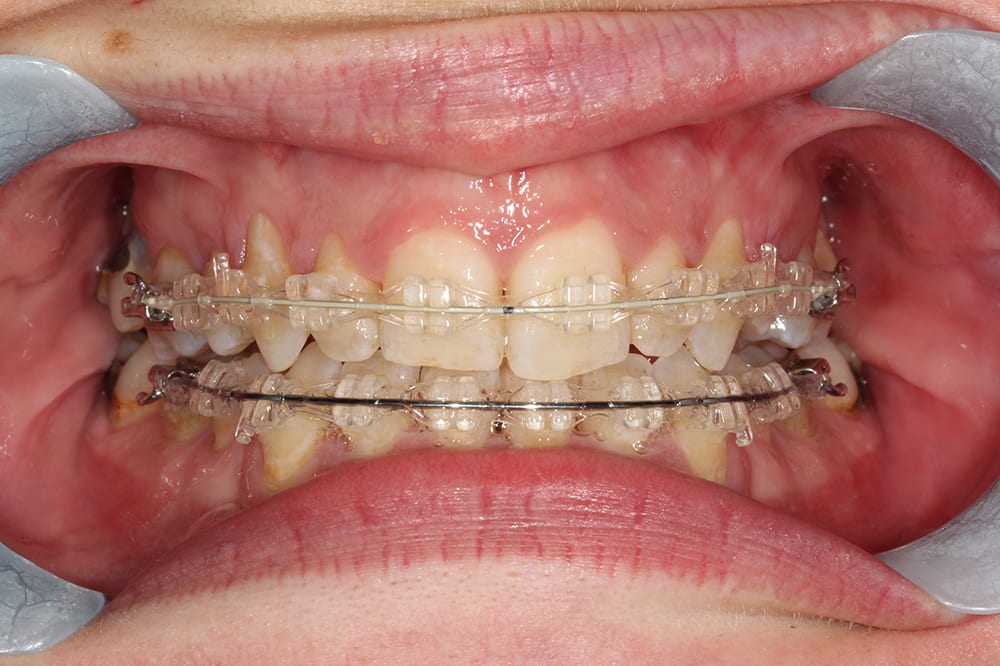 12 months into treatment
 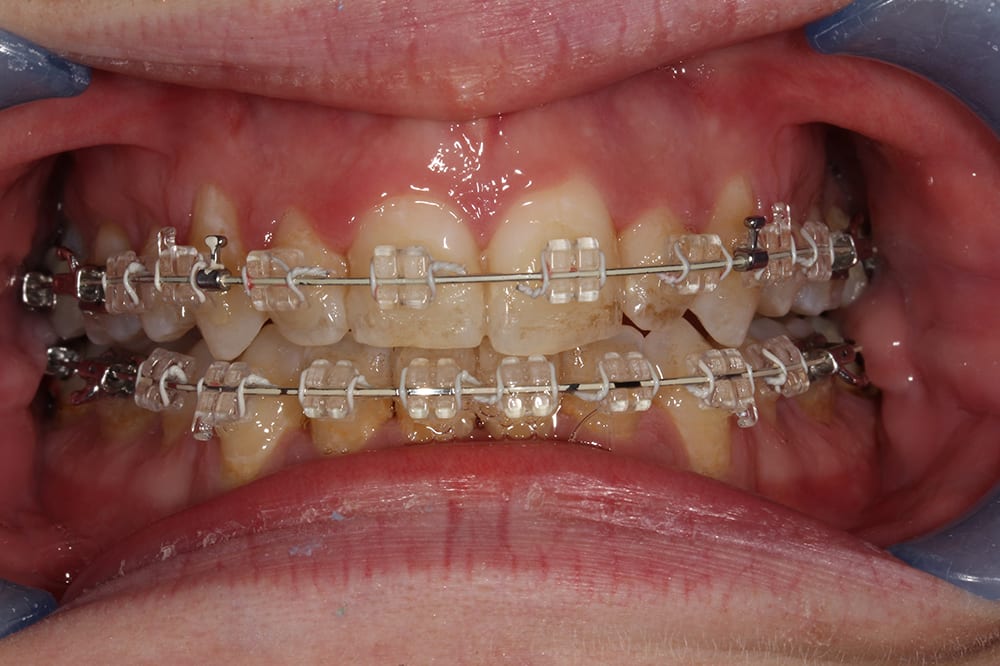 19 months into treatment
 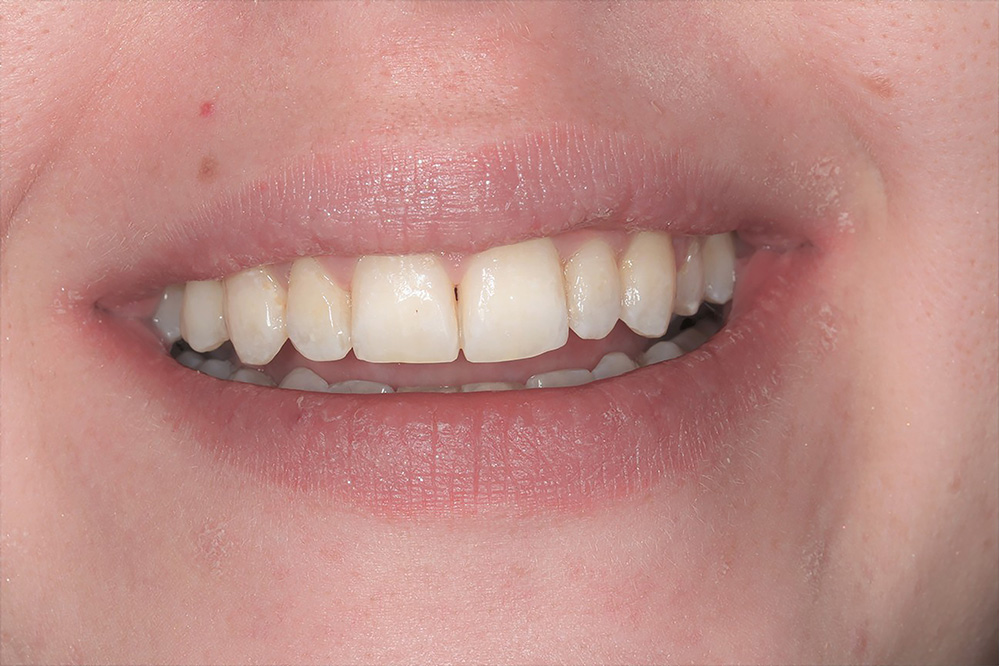 post treatment smile
 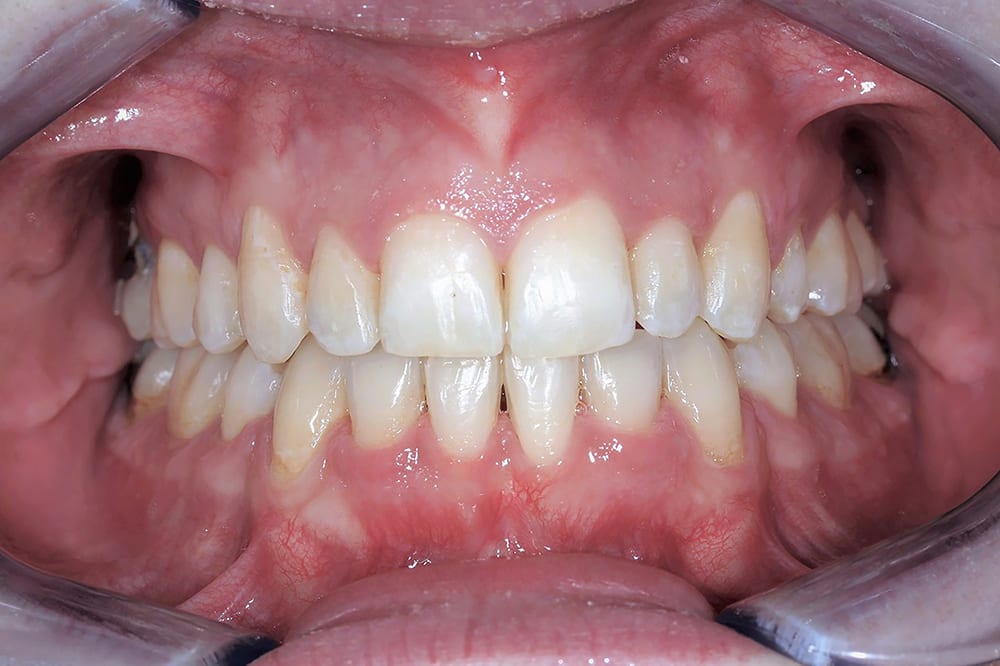 post treatment anterior
 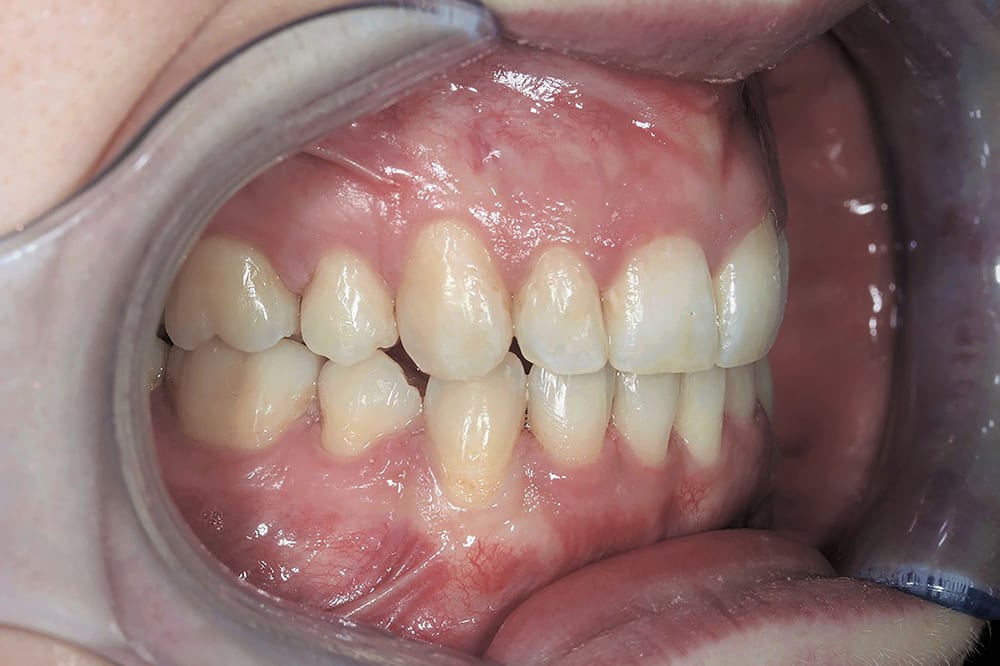 post treatment right lateral
 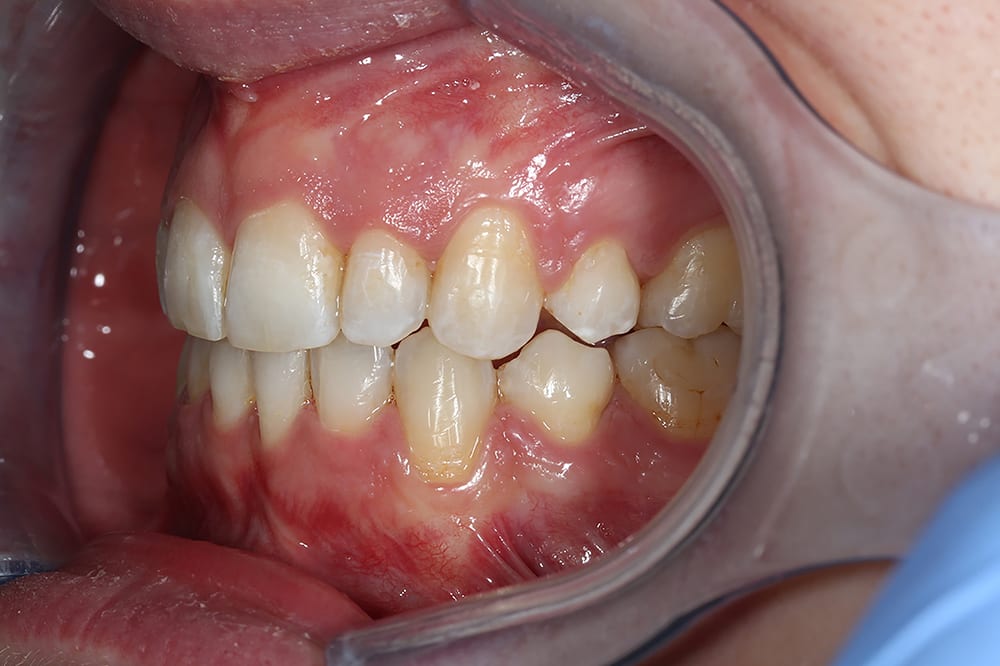 post treatment left lateral
 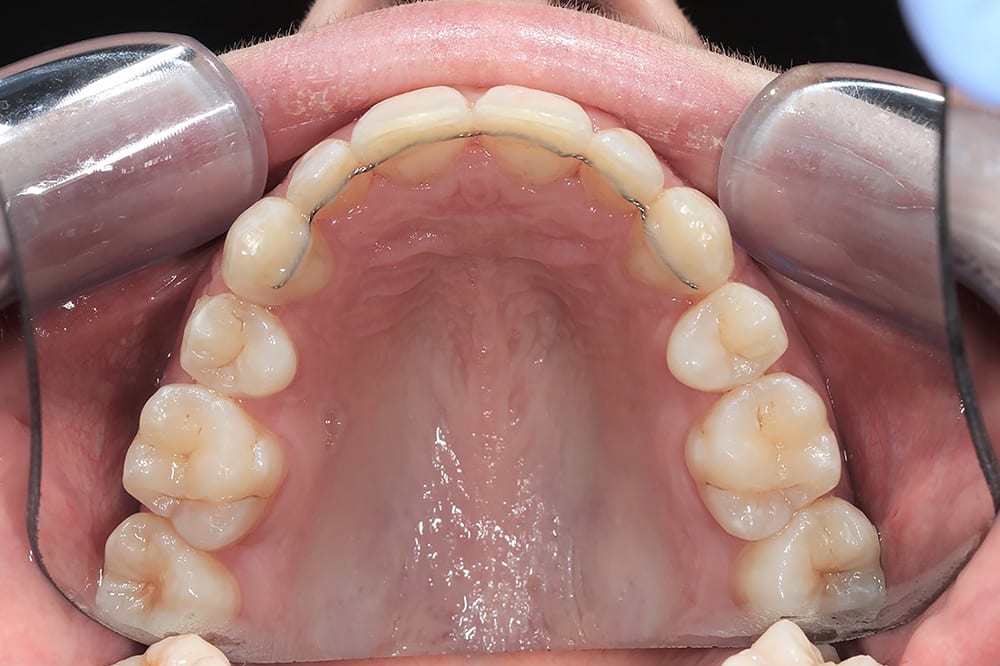 upper occlusal with fixed retainer
 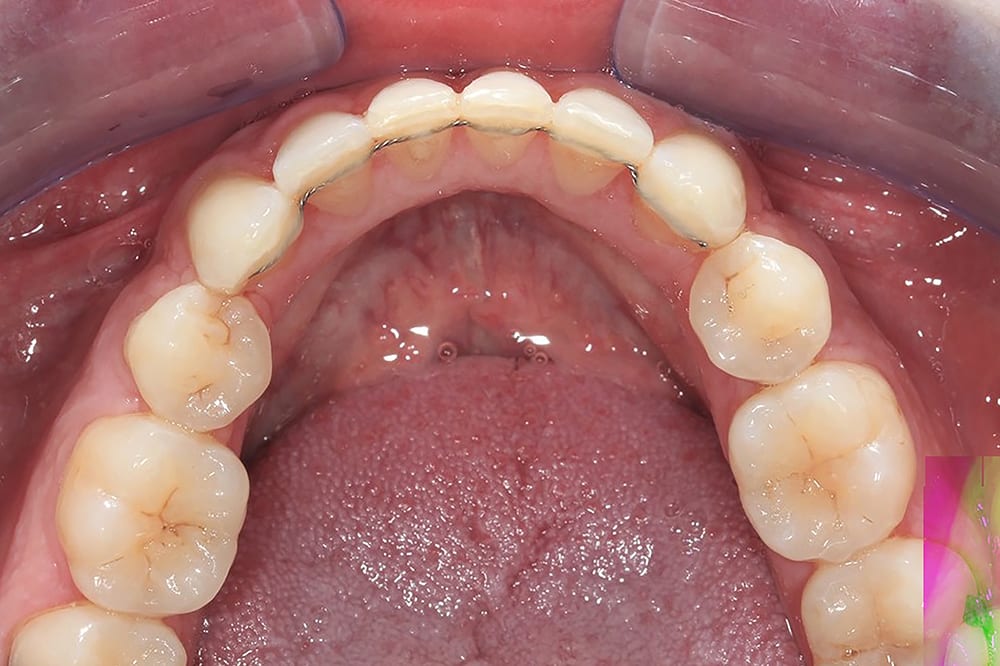 lower occlusal with fixed retainer