The Ultimate Sticking Brackets Guide
Bonding in orthodontics is subtly different to routine bonding the dentist undertakes for a number of reasons:
Orthodontics bonds to surface enamel – with NO mechanical preparation (ie no enamel surface removal with a handpiece) and there is no bonding to exposed dentine. Also the bond needs to be of a finite lifespan (ie the length of treatment) with ease of removal on treatment completion
This is the image that many believe occurs when enamel is etched
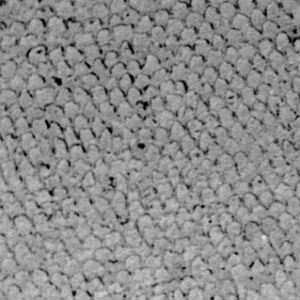
However, surface is enamel does not behave in this ideal manner and a clinically etched enamel surface looks more like this – not soo ideal!

So, it is important to ensure as good an etch as possible, but not essential.
Surface enamel etching is best when using 37% phosphoric acid in vicious liquid form for 30-45 seconds. Etching for longer reduces the surface roughness of the etched enamel and reduces bond strength.
2. The orthodontic bracket bond has 5 components with 2 interfaces:
- Enamel
- Enamel-composite interface
- Composite
- Composite-bracket interface
- Bracket

Hence there are 3 possible sites of failure, enamel – composite, within the composite, and bracket-composite, the most common site of failure being bracket-composite. It is important to note that failure can be at more than one site.
We can use the simple information of site of bond failure clinically to understand why a bracket bond may have failed.
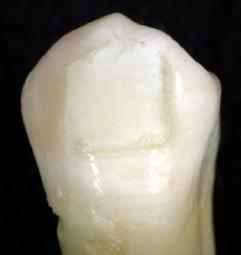
If we look at the bracket and tooth surface of a failed bond.
If all the composite is on the bracket and none on the tooth. The failure has been at the enamel – composite interface.
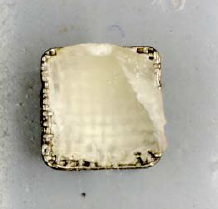
This would suggest either there was insufficient etching to achieve a good mechanical bond to enamel OR there was contamination of either the tooth surface (eg saliva) or the composite surface (eg the nurse has ‘patted’ the composite on to the bracket, contaminating the surface)
If there are equal amounts of composite on both bracket and tooth. The failure has within the composite. This is commonly caused by too thick a layer of composite ; the ideal composite thickness is 0.2mm for orthodontic brackets. To prevent this make sure the bracket is firmly pressed home onto the tooth surface before setting.
Also using contoured base brackets manufactured to match the shape of the individual tooth surface aids in reduced excess thickness of composite.
The 3rd site for bond failure is at the composite – bracket interface. This is the most common site as the mechanical bond between the composite and bracket base is easily contaminated when handing before bracket placement. But it is important to note that as the enamel -composite bond strength is greater then the tensile strength of enamel, it is preferable to have bracket failure occulting without damage to the tooth surface.
Also, at debond ideally we would like the ‘failure’ on debond to be at enamel – composite interface, this risks the possibility of enamel fracture. But, It is safer for the debond to fail at the bracket-composite interface to avoid enamel fracture and you have to ‘clean up’ the remaining composite.
3. Bond strength is measured in MPa (Mega Pascals)
Pascals is Force per Units area, hence this allows comparison of data using different bonding area.
Newtons (force) alone is an inappropriate means of expressing bond strength as it does not allow for the area of the bond (different size of brackets).
To increase the bond strength you can either improve the bond between components OR increase the surface area bonded – or a combination of both.
The majority of orthodontic composites have higher (laboratory) bond strengths (>15 MPa) than the tensile bond strength of enamel (approx. 11MPa). Another reason why at debond it is preferable for the bond to fail at the composite-backet interface.
The enamel – composite bond is a mechanical bond with minimal chemical bonding due to the extremely high mineral content. This is significantly different from dentine bonding which is minimal mechanical bonding and the majority of the bond strength is chemical by hybridisation of the collagen. Hence the bonding ‘primers’ used for dentine bonding and enamel bonding are VERY different.
4. Materials
In bonding to enamel the ‘primer’ is unfilled resin, whose purpose is to flow into the enamel etch pattern to aid the mechanical retention upon setting.
In dentine the ‘primer’ is a series of chemical treatments to promote and increase the formation of the collagen-composite hybridisation layer. Use of dentine ‘primer’ on enamel results in a weaker bond
Self Etch Primers tend to have lower bond strength and higher clinical failure rates than ‘conventional’ bonding. They use a phosphoric acid ester and have higher pH than phosphoric acid. Because of this they can cause chemical burns if they contact skin/mucosa.
When using a light cured composite and primer, DO NOT set the primer before placing bracket/composite as the surface created is now smooth and chemically inert, meaning a weaker bond. The best bond strength technique is to very thinly coat the enamel surface with primer (least is best in this case) then place composite and bracket before light setting.
Orthodontic bonding composite is commonly a hybrid filled based on BisGMA resin with varying amount of TEGMA, HEMA (resins) and fillers to achieve desirable handling properties.
There is spectrum between 100% Resin based composite and 100% Glass Ionomers, these have been developed to try and combine some of the properties base materials (eg Glass Ionmer Fluoride release).
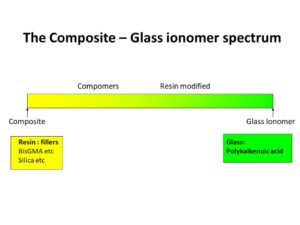
Glass Ionomer is poor for orthodontic bracket bonding with an unacceptably high failure rate, BUT it is ideal for bonding orthodontic bands as it chemically bonds to both enamel and stainless steel and with the much larger surface area available when placing an orthodontic band produces a clinically high performing bond when bands are used.
Resin Modified Glass Ionomer (mainly Class Ionomer with some resin) bonding materials are available (eg Fujibond) but bond strength is low with high clinical failure rates.
Compomers (mainly resin with some glass ionmer) have been tested but the clinical performance has been unacceptable. But compomer (e.g. Band-Lock) is a good material for cementing bands in place that needs repeated removal e.g. when using a Quad Helix for expansion.
100% Resin composites have the best performance, laboratory and clinically.
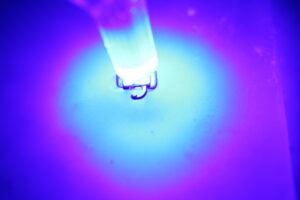
Composites are ‘set’ either chemically by mixing 2 or more components or by light activation. Light activated composite gives ‘set on demand’. You ned to be aware that some clinical chair/ operator lights are in the right light wavelength to cause setting! The ‘blue’ curing lights are NOT Ultra Violet and present minimal risk to the eye, with current lights being in the 450-490nm wavelength to ensure maximum setting in the shortest time
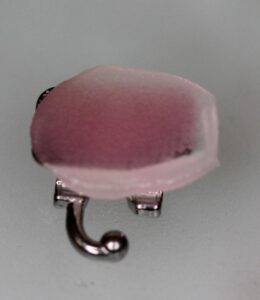
The closer, more intense the light and longer the composite is exposed to the light – the greater the set of the composite. Metal brackets are not transparent and light does not pass through the bracket!!!!!!!
This the WRONG way to light cure a metal bracket. You can see the pink unset composite – this is after 12 seconds of high intensity light!!
Hence the light source must be directed from the side of the bracket. If the light is directed from the incisal surface towards the tooth apex the enamel and dentine structure act like fibre optics getting the maximum amount of light to the composite under the bracket.
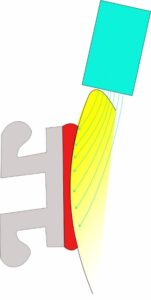
Using a high intensity LED light of the correct wavelength for the composite in this manner means that clinical curing time of 3-4 seconds is possible saving valuable clinical time.
Ceramic brackets do allow transmission of light and hence a greater degree of set, higher clinical bond strength and lower failure rate. Early ceramic brackets mistakenly used Silane to increase the composite-bracket bond strength, but as explained above this resulted in bracket failure occulting at the enamel-composite interface and unwanted enamel fractures.
Modern ceramic brackets rely on mechanical and not silane enhanced bond. Some (3M Clarity and 3M Gemini) have patented in-built ‘fault’ lines incorporated by design to initiate composite-bracket failure when debonding pliers are used correctly
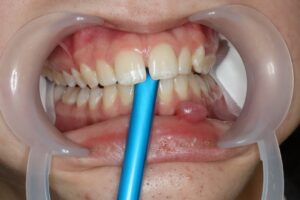
5. Bracket Bonding Technique
When etching and bonding maintain moisture control is vital. There is little evidence to support the use of pumice or air abrasion in increasing bond strength. The most common cause of bracket failure is poor bonding technique so it is important to use a good technique
The main sources of saliva are the parotid and sublingal gland ducts. Placing moisture absorbent pads (eg Dry Tips) over the parotid ducts with a saliva ejector under the tongue next to sub lingual glands ensures the collection and removal of the saliva ‘at source’ and prevents it pooling.
The enamel is etched for 30seconds using viscous liquid 37% phosphoric acid, washed and dried.
A very thing (least is best amount of unfilled resin primer is then applied (DO NOT cure). The use of a moisture insensitive primer (unfilled resin) (eg 3M Transbond MIP) means that any subsequent accident contamination with either saliva or blood can essentially be ignored with no reduction in bond strength.
The brackets are then placed. Placing the posterior/molar brackets first means there is less time for moisture from breathing to contaminate the surfaces. I light cure the molar tubes as they are placed to reduce the chance of accidental movement of the bracket when bonding the rest of the teeth.
I the prefer to the brackets in the sequence from lower left to lower right, then upper right to upper, removing excess composite as I place the brackets. Finally light curing before removing the cheek retractors etc and placing the mechanics.
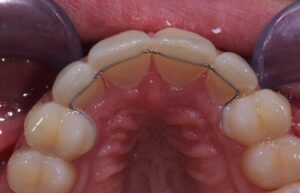
6. Bonding retainers
When bonding retainers we want maximum bond strength with long term/lifelong survival. So we need to modify both our bonding technique and materials to achieve this
To increase the enamel – composite bond strength we want to minimally prepare the enamel surface. Using a round diamond bur to ‘grind’/remove the 0.1-0.25mm aprismatic surface layer – this increases bond strength by appox 60%) before etching using viscous liquid 37% phosphoric acid for 30-40 seconds.
Remember to carefully isolate and dry.
Micro etching/sand blasting is not aggressive enough to remove sufficient enamel , it increases bond strength by reduction in surface tension, allowing improved flow of unfilled resin, but to a much lesser extent than a using diamond bur as described above.
Increasing bond are increase the bond strength to the maximum. So extend the composite incisal-gingival and mesio-distal as reasonable. I tend to extend the composite to about 1mm form the interproximal contact.
Materials for bonded retention. We want different properties from the composite use to bond retainers, we want good bond strength to enamel, good mechanical retention to the retainer and high wear resistance. We also want good clinical handling properties..
Use a moisture insensitive enamel primer (eg 3M Tranbond MIP) and a posterior flowable composite. These posterior composites have very high wear / abrasion resistance with excellent bond strength. I prefer to use Kulzer Venus Diamond flowable de to it surace hardness.
The retention of the wire into composite is purely a mechanical bond, hence smooth, highly polished metal surface will be more prone to failure in comparison to multistrand wires. GAC Wildcat wire (unfortunately no longer available) had the best mechanical retention in composite and was easily bent. If you use flat chain style retainer air abrasion/sandblasting will increase the mechanical retention in composite
7. Bonding to restorations
Ceramic – in my clinical experience the sequence is firstly to use a hydrofluoric acid and silane coupler on the ‘virgin’ ceramic surface, then enamel primer, composite, bracket.
First carefully apply hydrofluoric acid (this one of the few acids that will actually attack glass) for 60 seconds, carefully remove and dry.
Then apply an alcohol-based silane coupler, apply for 30 seconds, dry and repat twice more (ie 3 applications).
Then apply your unfilled resin primer, bracket and composite.
This ensure minimal damage to the porcelain.
BUT, if that fails – sandblast/micro etch to break the glaze, then hydrofluoric acid and silane coupler
The 3rd level (and last gasp try) is to take a diamond bir to the ceramic surface, make sure you are through the glaze then hydrofluoric acid and silane coupler then enamel primer, composite, bracket.
Zirconica is a real nightmare!!!
It is extremely difficult to get a good bond to Zirconia and I have to often resorted to cutting a mechanical undercut into the crown/veneer.
Amalgam/gold
Sandblast/micro etch the surface then use a metal primer before applying enamel primer, composite, bracket
ALL the above is the opinion of Ross Hobson based on personal research (search Hobson using Pubmed), scientific reading and clinical experience. Some of the personal research undertaken was funded by 3M Unitek